Schedule Shutdown missing in macOS Ventura: One of the more interesting features in macOS Ventura is the Schedule Shutdown command, which lets you automatically shut down your Mac at a certain time. However, some users have been reporting that this feature is missing from their version of macOS Ventura.
If you’re one of those affected users, don’t worry – we’ll show you how to get it back. In this article, we’ll go over the steps to take if you can’t find the Schedule Shutdown command in macOS Ventura. We’ll also explain what might have caused the issue in the first place.
What is a Schedule Shutdown?
Table of Contents

Schedule Shutdown is a feature in macOS Ventura that allows you to set a schedule for your computer to automatically power off. This can be useful if you know you won’t be using your computer for a while and don’t want it to stay on and use up power.
To access Schedule Shutdown, go to System Preferences > Energy Saver. From here, you can set a schedule for your computer to power off. Simply select the day of the week, the time of day, and how long after the scheduled time you want your computer to remain on before shutting down.
Once you’ve set your schedule, click Save and then close System Preferences. Your computer will now shut down automatically at the specified time each week.
How to use Schedule Shutdown
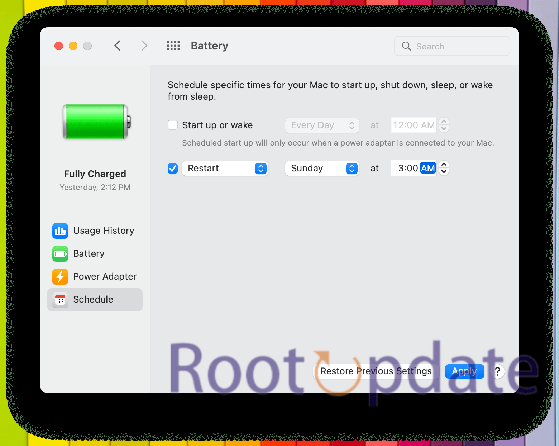
If you’re missing the Schedule Shutdown feature in macOS Ventura, don’t worry – it’s still there, just hidden! To access it, open System Preferences and click on the Energy Saver preference pane. Then, click on the Scheduled tab at the top of the window.
At the bottom of the Scheduled tab, you’ll see a checkbox labeled “Enable power off.” Check this box to turn on the Schedule Shutdown feature. Once you’ve done that, you can use the drop-down menus to schedule when your Mac will power off.
Just make sure to leave your Mac plugged in so it doesn’t power off while you’re away!
Missing Schedule Shutdown in macOS Ventura
If you’re used to scheduling regular shutdowns in macOS, you might be wondering where the feature has gone in the latest release, macOS Ventura. Unfortunately, Apple has removed the ability to schedule shutdowns from the operating system, although there are a few workarounds that can be used to achieve the same result.
One option is to use the built-in Automator app to create a shutdown schedule. This is a fairly straightforward process, but it does require some basic knowledge of Automator. Another option is to use a third-party app like Shutdown Scheduler, which offers a more user-friendly interface for creating shutdown schedules.
whichever method you choose, scheduled shutdowns can still be easily implemented in macOS Ventura.
How to get Schedule Shutdown back in macOS Ventura
If you’re running macOS Ventura and you’ve noticed that the Schedule Shutdown feature is missing from your system, there’s no need to panic. While it’s true that the feature is no longer accessible from the GUI, it’s still possible to schedule shutdowns using the Terminal.
To do this, open the Terminal and type in the following command:
sudo pmset standby 0
This will disable standby mode (which is what Schedule Shutdown uses to power down your system). Next, type in the following command to schedule a shutdown for 10pm:
sudo shutdown -h 22:00
You can change the time (in 24-hour format) to suit your needs. Finally, type in the following command to re-enable standby mode:
sudo pmset standby 1
And that’s all there is to it! With these simple Terminal commands, you can easily schedule shutdowns on macOS Ventura.
- install MacOS Monterey when macOS Ventura is available?
- Tile window to the left/right of the screen is missing in Mac
- Fix: RightFont not working on Mac
- Fix: Installing App Pkg on Ventura: “The Installation Failed” error
Conclusion
If you’re running macOS Ventura and you can’t find the Schedule Shutdown option in your system preferences, don’t worry — it’s still there, just hidden. To access it, simply open Terminal and type in the following command: “sudo pmset -a shutdown 15” This will set your computer to automatically shut down in 15 minutes. You can change the number to any value you want, from 1 minute to 24 hours. Once you’ve set the timer, hit enter and close Terminal. Your computer will nowshut down at the specified time.