System Restore When Windows 11 PC Cannot Boot To OS: Are you facing the dreaded situation where your Windows 11 PC refuses to boot to the operating system? Don’t panic! We’ve got you covered. In this blog post, we’ll explore effective methods to perform a system restore when your Windows 11 PC simply won’t cooperate. Whether it’s due to software issues or hardware glitches, we’ll walk you through step-by-step solutions that will have your computer up and running again in no time. So, grab a cup of coffee and let’s dive into the world of troubleshooting and system restores for Windows 11 PCs!
Possible reasons why Windows 11 PC cannot boot to OS
Table of Contents

Experiencing a situation where your Windows 11 PC fails to boot up can be frustrating and worrisome. But what could be causing this issue? Let’s explore some possible reasons why your PC isn’t able to boot into the operating system.
- Software Issues:
- Corrupted system files.
- Incompatible drivers.
- Hardware Malfunctions:
- Faulty hard drive.
- Defective RAM module.
- Power Supply Issues:
- Weak or damaged power supply unit.
- Monitor Issues:
- Malfunctioning display can mimic boot-up problems.
- Peripheral Interferences:
- USB devices or external storage drives causing conflicts.
- Corruption of System Files:
- Due to malware infections or improper shutdowns.
- Running repair commands in Command Prompt can help.
- Windows Recovery Tools:
- Utilizing Windows Recovery Environment (WinRE).
- Using a Windows 11 installation media for troubleshooting and repairs.
While these are just a few potential causes of why your Windows 11 PC cannot boot into the operating system, rest assured that there are various solutions available depending on the underlying problem you’re facing.
Fix System Restore When Windows 11 PC Cannot Boot to OS

If you’re unable to boot your Windows 11 PC, don’t panic! There are several methods you can try to fix the problem and restore your system.
Using Windows Recovery Environment
Using Windows Recovery Environment (WinRE) can be a lifesaver when your Windows 11 PC refuses to boot into the operating system. WinRE is a built-in tool that provides various troubleshooting options to help you resolve issues and restore your system.
- Initiating WinRE:
- Shut down your PC.
- Power it back on.
- As the manufacturer logo appears, press and hold the power button for about five seconds until the device shuts down.
- Repeat the above steps twice.
- On the third attempt, allow the PC to fully boot. This action triggers Automatic Repair, leading you to WinRE.
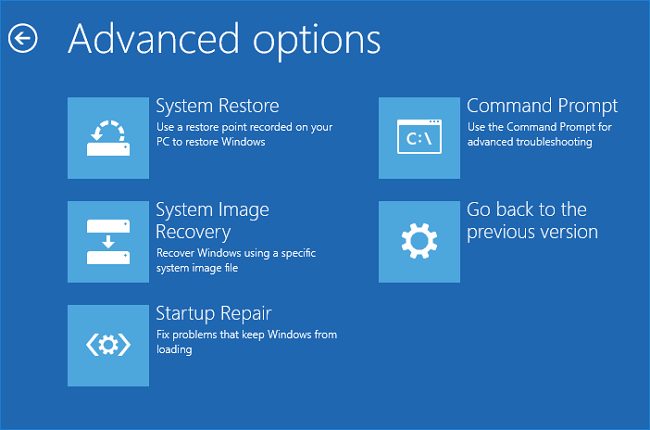
- Navigating in WinRE:
- Upon accessing WinRE, several options will be visible such as System Restore, Startup Repair, Command Prompt, etc.
- Using System Restore:
- Select the System Restore option.
- The feature allows you to revert your PC’s settings to a previously working state.
- Follow the System Restore Wizard’s instructions:
- Choose a restore point from a list of available dates.
- Confirm your choice.
- Wait for Windows 11 to finish the restoration.
- Points to Remember:
- WinRE should be among the primary tools for attempting repairs before resorting to a complete reinstall or reset of Windows 11.
- System Restore may not fix all issues, and further troubleshooting might be necessary.
Using Windows 11 Installation Media
Using Windows 11 Installation Media is another effective method to fix system restore when your Windows 11 PC cannot boot to the OS. This method requires a USB flash drive or DVD with the Windows 11 installation files.
- Access to Another Computer: You need another working computer.
- Create Installation Media: Use Microsoft’s Media Creation Tool to make a bootable USB or DVD.
- Insert Media: Insert the Windows 11 installation media into your non-booting PC and restart it.
- Change Boot Order: During startup, modify the BIOS settings to prioritize booting from the installation media rather than the hard drive.
- Start Repair: Once booted from the installation media, follow on-screen instructions and select “Repair your computer.”
- Access Advanced Options: Navigate to “Troubleshoot” > “Advanced options” > “System Restore.”
- Restore System: Choose a restore point and proceed to restore your system to an earlier state.
- Effective Troubleshooting: Using Windows 11 Installation Media is a useful solution when other methods fail to resolve booting issues.
- Advanced Recovery: It grants access to advanced recovery options and enables system restoration without needing direct OS access.
Remember that using this method may result in data loss if not executed correctly or if proper backups are not available.
Check system requirements
Before attempting any system restore or troubleshooting steps, it’s important to ensure that your Windows 11 PC meets the minimum system requirements. Incompatibility issues can prevent your PC from booting properly and cause various errors.
Hardware Specifications:
- Check for a compatible processor (e.g., Intel Core 8th generation or higher).
- Ensure you have at least 4GB of RAM.
- Verify sufficient storage space on your hard drive.
Windows Version:
- Confirm if your current Windows edition is eligible for the free upgrade to Windows 11.
Drivers and Firmware Updates:
- Make sure all required drivers and firmware updates are installed to prevent conflicts with the operating system.
Compatibility Issues:
- Check for known compatibility issues with third-party software or hardware connected to your PC, as they may interfere with the boot process.
By ensuring that your system meets all the necessary requirements, you increase the chances of successfully restoring your Windows 11 PC when it cannot boot to OS.
Restart the power supply
One of the simplest yet effective troubleshooting steps you can take when your Windows 11 PC fails to boot is to restart the power supply. It may sound like a basic solution, but sometimes all it takes is a simple restart to resolve underlying issues.
- Ensure your PC is completely shut down.
- Unplug the power cord from both the wall outlet and the back of your PC.
- Wait at least 30 seconds.
- Reconnect all cables securely.
- Turn on your computer.
This process discharges residual electrical charge and provides a fresh start. Restarting the power supply can resolve temporary glitches, potentially fixing boot issues. It’s a simple initial troubleshooting step before exploring more complex solutions.
Remember, even though restarting might seem like a straightforward action with minimal impact, it can often work wonders in resolving minor technical hiccups!
Unplug peripheral devices
One common reason why your Windows 11 PC may fail to boot to the operating system is due to conflicts with peripheral devices. These external components such as printers, scanners, or USB drives can sometimes cause issues that prevent your computer from starting up properly.
- Disconnect Peripherals: Unplug all peripheral devices from your PC.
- Start with USB cables.
- Remove memory cards or disks from card readers.
- Disconnect external monitors or projectors.
- Restart Computer: After disconnecting all peripherals, attempt to restart your computer.
- This action often resolves conflicts, facilitating a successful Windows 11 boot.
- Reconnect Devices Carefully: If unplugging peripherals solves the issue and your PC boots normally, reconnect each device one at a time.
- Identify which device was causing the problem.
- Update drivers for the problematic device if needed.
- Consider replacing the troublesome device if necessary.
By taking this simple step of unplugging peripheral devices when experiencing booting issues on Windows 11 PCs, you may be able to get back into your operating system quickly and efficiently without further complications!
Run repair command in Command Prompt
One of the possible solutions to try when your Windows 11 PC cannot boot to the OS is running a repair command in Command Prompt. This can help fix any corrupted or missing system files that may be causing the issue.
- Access Windows Recovery Environment:
- Restart your PC.
- During startup, press a specific key combination.
- In the recovery environment, select “Troubleshoot” > “Advanced options.”
- Open Command Prompt:
- Choose “Command Prompt.”
- Use Repair Commands:
- In the Command Prompt window, utilize repair commands like SFC (System File Checker) and DISM (Deployment Image Servicing and Management).
- These commands scan for and restore damaged files within your operating system.
- Be Patient:
- Running repair commands may take some time, so exercise patience.
- Restart and Test:
- After successful completion of the repair commands, restart your PC.
- Check if it can now boot into Windows 11.
- Caution:
- Use Command Prompt for repair commands only if you are comfortable with it.
- Seek assistance from a knowledgeable professional if unsure or uncomfortable with Command Prompt navigation.
By following these steps, you can attempt to resolve boot-related issues on your Windows 11 PC without having to reinstall the entire operating system. However, keep in mind that there could be other underlying causes for why your PC won’t boot properly.
Reinstall Windows as a reliable fix
Reinstalling Windows can be a reliable fix when your Windows 11 PC fails to boot to the operating system. While it may seem like a drastic measure, reinstalling the OS can often resolve issues that cannot be fixed through other methods.
- Prepare Installation Media:
- Obtain a copy of the installation media or ISO file from Microsoft’s official website or create a bootable USB drive using another PC.
- Backup Data:
- Ensure all important files and data are backed up before proceeding.
- Insert Installation Media:
- Insert the installation media into your non-bootable PC and restart it.
- Begin Setup:
- The setup process should start automatically.
- Follow on-screen instructions to select language preferences, agree to license terms, and choose an installation location.
- Choose Installation Type:
- Decide between a clean install or upgrading existing installations.
- Opt for a clean install if possible, as it wipes out underlying issues.
- Complete Installation:
- Finish the installation process.
- Install Drivers and Updates:
- Reinstall necessary drivers and update software applications to their latest versions.
- Data Backup Reminder:
- Reinstalling Windows removes installed programs and settings, so remember to back up data in advance.
- License and Product Keys:
- Keep note of any necessary licenses or product keys for future reference.
By performing a clean reinstallation of Windows 11, many stubborn errors that prevent normal booting can often be resolved effectively without having expert technical knowledge in troubleshooting complex issues!
Related:
- Fix: Cannot Install The HWiNFO Driver In Windows 11
- Fix: Power Troubleshooter Missing In Windows 11
- How To Create A Bootable USB Using MacOS Terminal
Conclusion
In situations where your Windows 11 PC refuses to boot to the operating system, it can be a frustrating and worrisome experience. However, there are several steps you can take to try and fix this issue.
Make sure to check the system requirements of Windows 11 and ensure that your PC meets them. Restarting the power supply and verifying the functioning of your PC monitor are simple yet effective troubleshooting steps. Additionally, unplugging peripheral devices can help eliminate any conflicts or issues they may be causing.
If these initial actions don’t resolve the problem, you can try using the Windows Recovery Environment or utilize a Windows 11 installation media for system restore options. Running repair commands in Command Prompt or utilizing startup options for repairs might also prove helpful.
However, if all else fails, reinstalling Windows could provide a reliable solution. This step should only be taken as a last resort after exhausting all other troubleshooting methods.
Remember that each situation is unique and what works for one person may not work for another. It’s always best to consult with professional technical support if you’re unsure about any of these procedures or if none of them seem to resolve your issue.
By following these recommendations and taking appropriate action based on your individual circumstances, you increase your chances of successfully restoring your Windows 11 PC when it cannot boot into OS mode.
Always remember to back up important files regularly so that even in worst-case scenarios like this one, you won’t lose valuable data.