Unlock Bootloader On Any LG SDM845 : Are you looking to unlock the bootloader on your LG SDM845 device powered by Snapdragon 845? Well, you’ve come to the right place! Unlocking the bootloader can give you more control over your smartphone, allowing for custom ROM installations and system modifications. In this blog post, we will guide you through a step-by-step process on how to unlock the bootloader on any LG SDM845 with ease. So grab your device and let’s dive into the exciting world of bootloader unlocking!
How to Unlock Bootloader on any LG SDM845 [Snapdragon 845]
Table of Contents

Unlocking the bootloader of your LG SDM845 device is the key to unleashing a world of possibilities for custom development. From gaining administrative privileges through rooting with Magisk to flashing custom binaries like LSPosed, custom ROMs, and recoveries, it’s a door to endless customization.
However, the process is not straightforward for LG devices powered by the Snapdragon 845 chipset. The good news is that the firehose file for these devices is now available, allowing you to unlock the bootloader. This comprehensive guide will walk you through the steps, but please proceed with caution as it may void your warranty and erase all data on your device.
STEP 1: Download LG Bootloader Unlock Files
- Visit this link and download “Unlock.zip.”
- Extract the downloaded file (Credits: XDA Senior Member EmanuelCN).
By completing this initial step, you’re one step closer to unlocking your LG SDM845 device’s bootloader and enjoying all of its benefits. Stay tuned for our next blog post where we delve into Step 2: Install EDL Drivers!
STEP 2: Install EDL Drivers
To unlock the bootloader on any LG SDM845 device, you need to install the EDL (Emergency Download) drivers. These drivers are essential for establishing a connection between your device and your computer.
- Download the Drivers:
- Start by downloading the Qualcomm HS USB QD Loader 9008 drivers. You can usually find these drivers on the official Qualcomm website or from trusted sources.
- Extract the Drivers:
- Once the drivers are downloaded, extract the compressed files to a location on your computer. This will typically be in a zip or rar format.
- Connect your Device:
- Make sure your Qualcomm-based device is powered on and connected to your PC using a USB cable.
- Enter Device Manager:
- Press the Windows key + X and select “Device Manager” from the menu.
- Locate your Device:
- In Device Manager, find your connected Qualcomm device. It might be listed under “Other devices” or “Ports (COM & LPT)” with a yellow triangle icon indicating a driver issue.
- Update Driver:
- Right-click on your device and select “Update driver.”
- Browse for Drivers:
- Choose the option to “Browse my computer for driver software.”
- Select the Driver Location:
- Click “Browse” and navigate to the folder where you extracted the Qualcomm HS USB QD Loader 9008 drivers.
- Install the Driver:
- Select the folder, and then click “Next.” Windows will now install the necessary drivers.
- Complete the Installation:
- After the installation is complete, you will see a confirmation message, and the Qualcomm HS USB QD Loader 9008 drivers will be successfully installed on your PC.
- Verify the Installation:
- To confirm that the drivers are installed correctly, you can go back to Device Manager and ensure that your Qualcomm device is now listed without any error icons.
- Restart your PC:
- It’s a good practice to restart your computer to ensure that the drivers are properly integrated and functioning.
Now, the Qualcomm HS USB QD Loader 9008 drivers should be installed and ready to communicate with your Qualcomm-based device, which is essential for various tasks like firmware flashing, unbricking, and more.
STEP 3: Install QPST
Installing the Qualcomm Product Support Tools (QPST) is an essential step in unlocking the bootloader on any LG SDM845 powered by Snapdragon 845. QPST allows you to communicate with your device and perform various tasks, including flashing firmware and configuring settings.
Note: QPST is a set of tools and utilities designed for use by service personnel in authorized service centers to perform various tasks on Qualcomm devices. Ensure you have the necessary permissions and rights to use this software, and only use it on devices you have the authority to service.
- Download QPST:
- Go to the official Qualcomm website or a trusted source to download the Qualcomm Product Support Tool (QPST). Please be cautious and only download it from reputable sources to avoid malware or other security risks.
- Install QPST:
- Once the download is complete, locate the installer file and double-click it to run the installation.
- Follow the Installation Wizard:
- Follow the on-screen instructions provided by the installation wizard. You’ll typically need to agree to the terms and conditions, choose an installation directory, and select the components you want to install. QPST consists of several tools, so choose the ones you need. The core components are QPST Configuration, QPST Service Programming, and QPST Software Download.
- Install Drivers (if prompted):
- During the installation, you might be prompted to install Qualcomm USB drivers. If prompted, install the drivers as they are necessary for QPST to communicate with your Qualcomm devices.
- Complete the Installation:
- After the installation process is finished, you will receive a confirmation that QPST has been successfully installed on your PC.
- Launch QPST:
- Find the QPST tools in your Start Menu or on your desktop if you created shortcuts during installation. Launch the tool you need for your specific task (e.g., QPST Configuration, QPST Service Programming, or QPST Software Download).
- Connect Your Qualcomm Device:
- Connect your Qualcomm-based device to your PC using a USB cable. Ensure that the device is powered on and recognized by your PC.
- Start Using QPST:
- Once your Qualcomm device is connected and recognized, you can start using the QPST tools for tasks such as flashing firmware, programming, diagnostics, and more.
STEP 4: Enable OEM Unlock
Enabling the OEM unlock feature on your LG SDM845 is an important step in unlocking the bootloader. This allows you to gain full control over your device and install custom ROMs or root access.
- Access Developer Options:
- Open the “Settings” app on your Android device.
- About Phone:
- Scroll down and look for the “System” or “About Phone” option. The wording might vary slightly depending on your device.
- Build Number:
- In the “About Phone” or “System” section, look for an option called “Build Number” or something similar.
- Enable Developer Mode:
- Tap on “Build Number” seven times quickly. You will likely be prompted to enter your device’s PIN or pattern to confirm your action.
- Developer Options:
- After you’ve successfully tapped the “Build Number” seven times, you will see a message that says “You are now a developer!” or something similar. This means that Developer Options are now accessible.
- Access Developer Options:
- Return to the main “Settings” screen, and you will now see a new menu item called “Developer Options” or “System > Developer Options.”
- Enable USB Debugging:
- Enter the “Developer Options” menu and scroll down until you find the “USB Debugging” option. Turn it on by toggling the switch to enable USB debugging.
- Enable OEM Unlock:
- Additionally, within the “Developer Options” menu, you can look for the “OEM Unlocking” option. Enable it by toggling the switch. You may need to confirm this action with your device’s PIN or pattern.
STEP 5: Boot to EDL Mode
To unlock the bootloader on your LG SDM845 with Snapdragon 845, you need to boot to edl mode:
Here’s how you can do it:
- Ensure Drivers Are Installed:
Before you proceed, make sure that you have already installed the Qualcomm HS USB QD Loader 9008 drivers on your PC. If not, refer to the instructions I provided earlier for installing those drivers.
- Connect your Device:
- Connect your Qualcomm-based device to your PC using a USB cable.
- Turn Off your Device:
- Power off your device completely.
- Prepare the Button Press Sequence:
- On your powered-off device, you will need to press and hold specific buttons in a certain sequence. Ensure you have your Volume Down and Power buttons ready.
- Enter EDL Mode:
- Press and hold the Volume Down and Power buttons simultaneously.
- After a few seconds, the screen should go black. When it does, release the Power button but continue to hold the Volume Down button.
- While holding the Volume Down button, start pressing the Volume Up button repeatedly, about once every second. Keep holding the Volume Down button as you do this.
- If done correctly, your device should enter Emergency Download Mode (EDL).
- Check Device Manager:
- Now, on your PC, open Device Manager. You can usually access Device Manager by right-clicking the “Start” button and selecting “Device Manager.”
- Under Device Manager, look for your device. It should be listed as “Qualcomm HS USB QD Loader 9008” if you’ve successfully entered EDL Mode.
- If you see your device listed as “Qualcomm HS USB QD Loader 9008,” you have successfully booted your device into EDL Mode.
STEP 6: Set Up QFIL
- Launch QFIL:
- Launch Qualcomm Flash Image Loader (QFIL) on your PC.
- Set Build Type to “Flat Build”:
- In QFIL, navigate to the “Select Build Type” drop-down menu and choose “Flat Build.”
- Programmer Path:
- In the “Programmer Path” section, click on the browse button (usually represented by three dots or an ellipsis).
- Select the “prog_ufs_firehose_Sdm845_lge.elf” file from the location where you extracted the “Unlock.zip” file. This file is essential for flashing your Qualcomm device.
- Change Device Type to “UFS”:
- At the bottom right corner of the QFIL window, you should see an option for “Device Type.” Select “UFS” from the drop-down menu. This setting is crucial as it specifies the storage type of your device.
- Select the Device Port:
- QFIL should automatically recognize the port your Qualcomm device is connected to. You’ll typically see the port number listed next to “Port.” If QFIL doesn’t recognize your device, click on “Select Port…” and choose the appropriate port your phone is connected to.
Now, you have set up QFIL for flashing your Qualcomm device. Before proceeding, ensure that you have the necessary firmware files and that you’ve backed up your data as this process can lead to data loss.
STEP 7: Backup abl_a and abl_b
- Select Partition Manager:
- In QFIL, go to the “Tools” tab.
- List All Partitions:
- Select “Partition Manager” to list all the partitions on your Qualcomm device.
- Back Up Partition “abl_a”:
- Find the partition named “abl_a” in the list of partitions.
- Right-click on “abl_a” and choose the option to “Manage Partition Data.”
- Click on “Read Data” to back up the current partition data. This step creates a backup of the “abl_a” partition.
- Load the “V35abl.img”:
- After backing up “abl_a,” you can load the “V35abl.img” file from the “Unlock” folder. This image file is likely intended for flashing or updating the “abl_a” partition.
- Rename “readata.bin”:
- Open the Run dialog by pressing Windows+R.
- Type in
%appdata%and hit Enter. This will take you to the AppData folder in your user profile. - Navigate to “Qualcomm” > “Qfil” > “COM_X” (where X is the port your phone was connected to).
- Find the file named “readata.bin” and rename it to “Abl_abackup.bin.” This file likely contains the backup of the “abl_a” partition.
- Repeat for “abl_b”:
- Repeat the same process for the “abl_b” partition. Back up the “abl_b” partition and save it with a unique name, and update the corresponding image file if needed.
STEP 8: Backup laf_a and laf_b
- Select Partition Manager:
- In QFIL, go to the “Tools” tab.
- List All Partitions:
- Select “Partition Manager” to list all the partitions on your Qualcomm device.
- Back Up Partition “laf_a”:
- Find the partition named “laf_a” in the list of partitions.
- Right-click on “laf_a” and choose the option to “Manage Partition Data.”
- Click on “Read Data” to back up the current partition data. This step creates a backup of the “laf_a” partition.
- Rename “readata.bin” and Erase “laf_a”:
- Open the Run dialog by pressing Windows+R.
- Type in
%appdata%and hit Enter. This will take you to the AppData folder in your user profile. - Navigate to “Qualcomm” > “Qfil” > “COM_X” (where X is the port your phone was connected to).
- Find the file named “readata.bin” and rename it to “laf_abackup.bin.” This file likely contains the backup of the “laf_a” partition.
- Click on “Erase” to remove the “laf_a” partition.
- Repeat for “laf_b”:
- Repeat the same process for the “laf_b” partition. Back up the “laf_b” partition, save it with a unique name, and erase the “laf_b” partition as well.
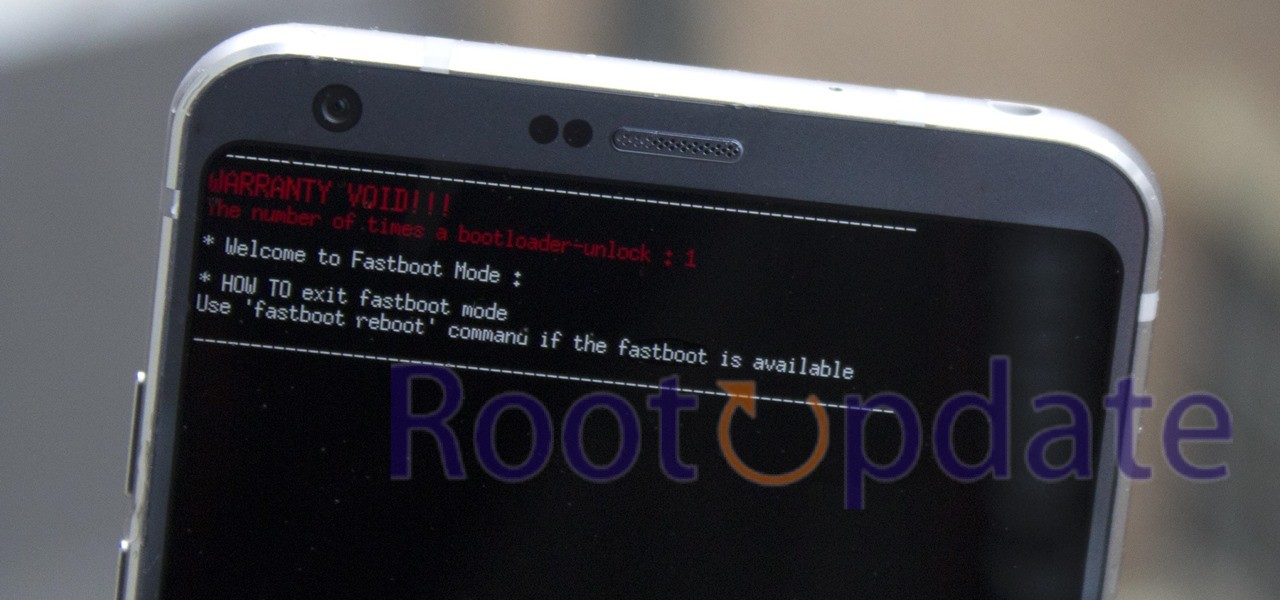
STEP 9: Boot to Fastboot Mode
Install Fastboot Drivers:
- Before starting, make sure you have installed Fastboot drivers on your PC. You can typically install the official Android SDK platform tools, which includes Fastboot. Alternatively, you can use standalone Fastboot drivers compatible with your device.
Boot into Fastboot Mode:
- Ensure that your device is connected to your PC via a USB cable.
- Power off your device.
- Press and hold the Volume Down and Power buttons simultaneously for approximately 8 seconds.
- After 8 seconds, release the Power button, but continue to hold the Volume Down button.
- While holding the Volume Down button, immediately press and hold the Volume Up button (or Volume – if you’re using certain devices like EM, EMW, or EAW).
- Keep holding the Volume Down and Volume Up (or Volume –) buttons simultaneously for a few seconds.
- Your device should boot into Fastboot mode. You will see a screen with information about your device.
STEP 10: Android SDK Platform Tools
- Download Android SDK Platform Tools:
- Go to the official Android SDK Platform Tools download page on the Android Developers website: https://developer.android.com/studio/platform-tools
- Scroll down to the “Command line tools only” section.
- Download the appropriate version for your operating system (Windows, macOS, or Linux). Choose the one that matches your PC’s operating system.
- Extract the ZIP File:
- Once the download is complete, extract the contents of the ZIP file to a location on your PC. You can use a program like 7-Zip or WinRAR to do this.
- Add Platform Tools to System Path (Optional but recommended):
- To use ADB and Fastboot from any command prompt or terminal window, it’s a good practice to add the Platform Tools directory to your system’s PATH. This way, you can use these tools from any location without specifying the full path to the executable.
- To add Platform Tools to your system’s PATH, follow these general steps (steps can vary depending on your operating system):
Windows:
- Search for “Environment Variables” in the Windows search bar and click on “Edit the system environment variables.”
- In the System Properties window, click the “Environment Variables” button.
- Under “System variables,” find the “Path” variable and click “Edit.”
- Add a new entry that points to the folder where you extracted the Platform Tools, e.g.,
C:\path\to\platform-tools. - Click “OK” to save your changes.
macOS and Linux:
- Open a terminal window.
- Edit your shell profile file (e.g.,
~/.bashrc,~/.zshrc, or~/.bash_profile) using a text editor likenanoorvim. - Add the following line to the file:
export PATH=$PATH:/path/to/platform-tools
- Save the file and run the following command to apply the changes:
source ~/.bashrc # or the profile file you edited
- Verify Installation:
- Open a new command prompt or terminal window and type “adb” or “fastboot” to ensure that the tools are recognized and working. If you see a list of ADB or Fastboot commands, the installation was successful.
STEP 11: Flash FRP and Unlock Bootloader on LG SDM845
- Transfer the frp.img to the Platform Tools Folder:
- Copy the “frp.img” file to the same folder where you have the Fastboot and ADB tools (Platform Tools) located. This makes it easier to execute Fastboot commands on the “frp.img” file.
- Flash the “frp.img”:
- Open a command prompt or terminal window and navigate to the directory where you have Fastboot and ADB tools.
- Run the following Fastboot command to flash the “frp.img” file to your device:
fastboot flash frp frp.img
- This command is specific to the task of flashing the “frp.img” to your device. The “frp.img” file is often used in bypassing Factory Reset Protection (FRP) on Android devices.
- Reboot to Fastboot:
- After flashing the “frp.img,” you may need to reboot your device into Fastboot mode again for further actions. You can do this with the following Fastboot command:
fastboot reboot bootloader
- This command instructs your device to reboot into Fastboot mode.
- After flashing the “frp.img,” you may need to reboot your device into Fastboot mode again for further actions. You can do this with the following Fastboot command:
- Unlock the Bootloader:
- To unlock the bootloader, you can use the following Fastboot command:
fastboot oem unlock
- Be aware that unlocking the bootloader can vary from one device to another, and the command might be different depending on your device model. Ensure you have the necessary permissions and knowledge to unlock the bootloader, as this action can void your warranty and result in data loss.
- To unlock the bootloader, you can use the following Fastboot command:
STEP 12: Load Backup abl and laf Files
- Boot your device to EDL Mode:
- Follow the steps I previously provided for booting your device into Emergency Download Mode (EDL Mode).
- Open QFIL Tool:
- Launch Qualcomm Flash Image Loader (QFIL) on your PC.
- Access Partition Manager:
- In QFIL, go to the “Tools” menu.
- Recover “abl_a”:
- Find the “abl_a” partition in the list of partitions within the Partition Manager.
- Right-click on “abl_a” and select an option similar to “Load Partition Data” or “Load Backup.”
- Choose the “abl_abackup.bin” file to restore the “abl_a” partition.
- Recover “abl_b”:
- Repeat the same process for the “abl_b” partition. Find it in the Partition Manager, right-click on it, and select “Load Partition Data,” then choose the appropriate backup file.
- Recover “laf_a” and “laf_b”:
- Perform the same procedure for the “laf_a” and “laf_b” partitions, finding and restoring them with the correct backup files.
STEP 13: Boot to Download Mode
- Connect your Samsung device to your computer using a USB cable.
- Ensure that your device is powered off.
- Press and hold the Volume Up button.
- While holding the Volume Up button, plug your phone back into the computer with the USB cable.
- Continue holding the Volume Up button until you see the Download Mode screen.
STEP 14: Flash KDZ Firmware
- Install LG Mobile Driver:
- Go to the extracted “Unlock” folder.
- Install the “LGMobileDriver_WHQL_Ver_4.4.2.exe.” This driver is essential for your PC to communicate with your LG device.
- Install LGUP Tool:
- Install the “LGUP_Store_Frame_Ver_1_14_3.msi” from the “LGUP-1-14-3-Patched” folder.
- Overwrite LGUP Folder:
- Replace the “LGUP” folder located in “LGUP-1-14-3-Patched” with the folder in “C:\Program Files (x86)\LG Electronics.” This is to ensure you have the patched version of LGUP.
- Launch LGUP:
- Open LGUP on your PC.
- Load KDZ Firmware:
- Load the KDZ firmware file you want to flash. KDZ files are specific to LG devices and contain the firmware you wish to install.
- Select “Refurbish” Mode:
- In LGUP, select the “Refurbish” mode. This mode is typically used for a clean installation of the firmware, which can include bootloader unlocking.
- Begin the Flashing Process:
- After selecting “Refurbish” mode, you can start the flashing process. LGUP will begin to flash the firmware onto your device. Make sure your device is connected via USB during this process.
- Wait for Completion:
- Wait for the flashing process to complete. Your device will be updated with the firmware you loaded.
Related:
After the process is complete, your device will boot into the operating system with the new firmware, which might include an unlocked bootloader if the firmware supports it.
That’s it! These are the steps to unlock the bootloader on any LG SDM845 device. If you have any questions or need assistance with any of the steps, feel free to ask in the comments.
Disclaimer: Proceed at your own risk. Rootupdate and its members are not responsible for any adverse effects on your device or data as a result of performing these steps.