Antimalware Service Executable High CPU & RAM Usage: Are you tired of your computer’s performance slowing down due to high CPU and RAM usage? One possible culprit could be the Antimalware Service Executable, also known as msmpeng.exe. This built-in Windows Defender feature is designed to protect your system from malware threats, but it can sometimes consume excessive resources, causing sluggishness and frustration. But fear not! In this blog post, we will explore several effective methods to fix the Antimalware Service Executable high CPU & RAM usage issue. So let’s dive in and reclaim control over your computer’s performance!
Antimalware Service Executable High CPU & RAM Usage
Table of Contents

The Antimalware Service Executable (often referenced as MsMPEng.exe) is a fundamental aspect of Windows Security. Its primary function is to shield your system from potential threats. Yet, numerous Windows users frequently report excessive RAM and CPU usage due to this service. Addressing these concerns, we elucidate steps to mitigate the high memory and CPU consumption by Antimalware Service Executable for Windows 10 and 11.
Fix: Antimalware Service Executable High CPU & RAM Usage

1. Disable Real Time Protection

One way to fix the issue of Antimalware Service Executable using high CPU and RAM is by disabling real-time protection. Real-time protection is a feature in Windows Defender that constantly scans your system for any potential threats. While this feature can be beneficial in terms of security, it can also consume a significant amount of system resources.
- Open Settings: Click on the “Start” button, then click on the gear-shaped icon (Settings) in the Start menu.
- Go to Update & Security: In the Settings window, click on “Update & Security.”
- Access Windows Security: In the Update & Security menu, select “Windows Security” from the left panel.
- Open Virus & Threat Protection Settings: In the Windows Security window, click on “Virus & threat protection” under the “Protection areas” section.
- Manage Settings: In the Virus & threat protection menu, locate and click on “Manage settings” under “Virus & threat protection settings.”
- Turn Off Real-Time Protection: Toggle the switch next to “Real-Time Protection” to the OFF position.
Note that disabling Real-Time Protection offers only temporary relief, and Windows will reactivate it automatically during your next login session or after a system restart.
2. Prevent Antimalware Service Executable from Scanning its Own Folder

One common cause of high CPU and RAM usage by the Antimalware Service Executable is when it continuously scans its own folder, leading to a never-ending loop. Fortunately, there are steps you can take to prevent this from happening.
- Access Windows Security Settings: Click on the “Start” button, then click on the gear-shaped icon (Settings) in the Start menu. In the Settings window, go to “Update & Security.”
- Open Virus & Threat Protection: In the Update & Security menu, select “Windows Security.” In the Windows Security window, click on “Virus & Threat Protection” under the “Protection areas” section.
- Access Virus & Threat Protection Settings: In the Virus & Threat Protection menu, locate and click on “Manage settings” under “Virus & Threat Protection settings.”
- Navigate to Exclusions: Scroll down to the “Exclusions” section and select the “Add or remove exclusions” link.
- Add an Exclusion: Choose “Add an Exclusion” and then select the “Folder” option.
- Select Windows Defender Folder: Navigate to the C:\Program Files\Windows Defender directory using the file explorer.
- Finalize Exclusion: After selecting the Windows Defender folder, click the “Select Folder” button to add it as an exclusion.
- Reboot the System: After making this exclusion, it’s recommended to reboot your system to ensure the changes take effect.
Adding the Windows Defender folder as an exclusion can help improve the operational efficiency of the Antimalware Service Executable by preventing it from continuously inspecting its dedicated folder during routine operations.
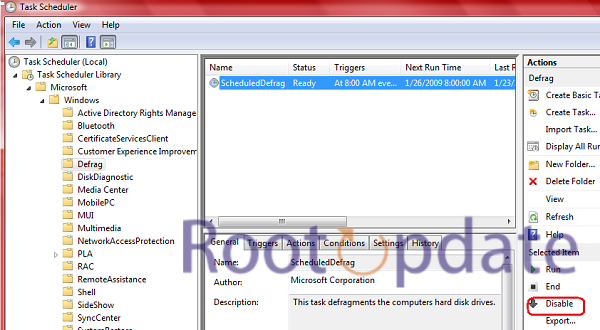
3. Disable Scheduled Tasks

Another method to fix the high CPU and RAM usage caused by Antimalware Service Executable is to disable the scheduled tasks associated with Windows Defender. These tasks are responsible for running regular scans and updates, which can consume a significant amount of system resources.
- Open Task Scheduler: Type “Task Scheduler” into the Windows Search function and press Enter.
- Navigate to Windows Defender Tasks: In the Task Scheduler window, expand the following folders in the left pane:
- Task Scheduler Library
- Microsoft
- Windows
- Windows Defender
- Disable Windows Defender Tasks: On the right side of the window, you’ll see a list of Windows Defender tasks. To disable a task, right-click on it and select “Disable.”
- Repeat for All Listed Tasks: Go through the list of Windows Defender tasks and disable all the ones you want to turn off.
By disabling these specific Windows Defender tasks, you can expect a noticeable reduction in CPU and RAM demands by the Antimalware Service Executable. However, be cautious when disabling tasks, as it may impact your system’s security. Only disable tasks if you have an alternative security solution in place or if you are experienced in managing security settings.
4. Install Third Party Antivirus Program

One effective solution to fix the issue of high CPU and RAM usage by Antimalware Service Executable is to install a third-party antivirus program. While Windows Defender is a built-in tool that offers basic protection, it may not always be the most efficient in terms of resource usage.
- Choose a Third-Party Antivirus: Select a well-known and reputable third-party antivirus software such as Norton, McAfee, Bitdefender, Avast, or AVG.
- Download and Install: Download the chosen antivirus program from the official website of the antivirus provider. Follow the installation instructions to set up the antivirus software on your computer.
- Automatic Windows Defender Disable: Most third-party antivirus programs are designed to automatically disable Windows Defender when they are installed. This is because running multiple antivirus programs simultaneously can lead to conflicts and system slowdowns.
- Resource Usage: Once you have a third-party antivirus program installed and Windows Defender is disabled, you should notice a reduction in resource usage, including a decrease in CPU and RAM usage by the Antimalware Service Executable.
- Regular Updates: Ensure that your chosen third-party antivirus software is regularly updated to keep your computer protected against the latest threats.
- Customize Settings: Many third-party antivirus programs offer customization options, so you can configure them to suit your preferences and security needs.
It’s important to note that while third-party antivirus programs can be effective in reducing resource usage, they should be kept up to date, and their performance should be regularly monitored to ensure they are providing adequate protection for your system. Additionally, it’s essential to keep your operating system and all software up to date to maintain overall system security.
5. Disable Windows Defender AntiSpyware Function Using Registry

One effective way to address the high CPU and RAM usage caused by the Antimalware Service Executable is to disable Windows Defender AntiSpyware function using the registry. This method allows you to have more control over your computer’s resources while still maintaining a level of security.
Note: Modifying the Windows Registry can have a significant impact on your system. Please proceed with caution and follow these steps carefully. Creating a system restore point is strongly recommended before making any registry changes.
- Open the Windows Registry Editor:
- Press the
Win + Rkeys to open the Run dialog. - Type “regedit” and press Enter or click OK. This will open the Windows Registry Editor.
- Press the
- Navigate to the Windows Defender Registry Key:
- In the Registry Editor, navigate to the following directory in the left panel:
HKEY_LOCAL_MACHINE\SOFTWARE\Policies\Microsoft\Windows Defender
- In the Registry Editor, navigate to the following directory in the left panel:
- Modify the “DisableAntiSpyware” Value (If It Exists):
- In the right panel, look for a DWORD value named “DisableAntiSpyware.”
- Double-click on “DisableAntiSpyware” to edit its Value Data.
- Change the Value Data to “1” (without quotes).
- Create the “DisableAntiSpyware” DWORD (If It’s Absent):
- If you don’t find the “DisableAntiSpyware” DWORD in the right panel, you can create it:
- Right-click on any empty space in the right panel.
- Choose “New” and select “DWORD (32-bit) Value.”
- Assign the name “DisableAntiSpyware” (without quotes) to the new DWORD.
- Double-click on the newly created “DisableAntiSpyware” DWORD to edit its Value Data.
- Set the Value Data to “1” (without quotes).
- If you don’t find the “DisableAntiSpyware” DWORD in the right panel, you can create it:
- Safety Tip: Create a System Restore Point:
- Before making any changes to the Windows Registry, it’s a good practice to create a system restore point as a backup in case anything goes wrong. To create a system restore point, you can:
- Type “Create a restore point” in the Windows search bar and open the corresponding settings.
- Click the “Create” button in the System Properties window to create a restore point.
- Before making any changes to the Windows Registry, it’s a good practice to create a system restore point as a backup in case anything goes wrong. To create a system restore point, you can:
- Restart Your Computer:
- After making the registry changes, restart your computer to apply the settings.
By modifying the “DisableAntiSpyware” registry value, you can effectively disable Windows Defender’s AntiSpyware function. Please exercise caution when working with the Windows Registry, as incorrect changes can lead to system instability.
Understanding Antimalware Service Executable (msmpeng.exe)
Antimalware Service Executable, also known as msmpeng.exe, is a process that belongs to Windows Defender. It plays a crucial role in protecting your computer against various threats such as viruses, malware, and spyware. While it is an essential component of Windows Defender, some users may experience high CPU and RAM usage due to this process.
When you run a scan or real-time protection is enabled, Antimalware Service Executable starts working in the background to analyze files and monitor system activities for any potential threats. This continuous scanning can consume significant system resources, leading to slower performance.
To address the issue of high CPU and RAM usage caused by Antimalware Service Executable, there are several steps you can take. One option is to disable real-time protection temporarily when you don’t need it actively monitoring your system. Another approach involves preventing the program from scanning its own folder since this can cause excessive resource consumption.
Additionally, disabling scheduled tasks related to Windows Defender scans can help alleviate the strain on your CPU and RAM. You can do this by accessing the Task Scheduler and modifying or disabling specific tasks associated with Windows Defender.
Alternatively, consider installing a third-party antivirus program if you find that Windows Defender’s impact on system resources remains problematic even after trying these solutions. There are many reputable options available that offer robust protection without causing excessive strain on your computer’s performance.
It’s worth noting that if you choose to install another antivirus program alongside Windows Defender or any other existing security software, make sure they don’t conflict with each other. Having multiple active antiviruses running simultaneously could lead to conflicts and potential vulnerabilities.
In some cases where none of these methods work effectively for reducing high CPU and RAM usage caused by Antimalware Service Executable, advanced users may opt for disabling certain aspects of the functionality using registry tweaks. However, caution should be exercised when making changes to the registry, as incorrect modifications can have adverse effects on your
Bonus Read: Elevate Windows Security
Shielding from Remote Attacks:
- Configure Network Settings: Review and configure your network settings to enhance security. Ensure that your firewall is enabled and set to block incoming and outgoing suspicious connections.
- Download Safely: Be cautious when downloading files from the internet. Only download from reputable sources, avoid suspicious email attachments, and consider using an antivirus program to scan downloads.
- Keep Software Updated: Regularly update your operating system, software applications, and antivirus software. Software updates often include security patches that protect your system from vulnerabilities.
Streamlined Uninstallation:
- Review Installed Apps: Periodically review the list of installed apps and programs on your computer. Some apps may run in the background and consume system resources even when not in use.
- Uninstall Redundant Software: Uninstall any unnecessary or redundant apps and programs to free up disk space and improve system performance.
- Access Settings > Apps: To manage and uninstall apps and programs, go to Settings > Apps in Windows. From there, you can easily uninstall unwanted software.
By following these additional tips, you can help fortify your Windows system against remote attacks and ensure that it runs smoothly and efficiently. Regular maintenance and security practices are essential for maintaining the health and performance of your computer.
Related:
- How to Hide/Block WiFi Networks in Windows 10/11
- How To System Restore When Windows 11 PC Cannot Boot To OS
- Fix: Cannot Install The HWiNFO Driver In Windows 11
- Fix: Power Troubleshooter Missing In Windows 11
- Download Latest QPST Tool or Qualcomm Flash tool for Windows
- Download Calman Ultimate for Business Free for Windows 7, 8, 10
- How to Hide Drives in File Explorer on Windows 11
- How To Disable/Enable Registry Editor In Windows 11
- How to Remove Duplicate Drives in File Explorer on Windows 11
Conclusion
In the end, tackling high CPU and RAM usage caused by Antimalware Service Executable can be a frustrating experience. However, with the solutions mentioned in this article, you should be able to alleviate the issue and get your computer back on track.
Remember that disabling real-time protection or scheduled tasks may leave your system vulnerable to malware attacks. It’s important to weigh the pros and cons before making any changes.
If you’re still experiencing performance issues after trying these fixes, it might be worth considering installing a third-party antivirus program. These programs often have lighter resource footprints and can provide effective protection without causing excessive CPU or RAM usage.
Additionally, if you choose to disable Windows Defender AntiSpyware function using registry modifications, proceed with caution as editing the registry can have unintended consequences if not done correctly. Always backup your registry or consult expert advice before making any changes.
Finding a balance between protecting your computer from malware threats and maintaining optimal system performance is key. Experiment with these solutions and see which one works best for you. Happy computing!